5 Best Network Monitoring Tools for 2023

5 best network monitoring tools for 2023

Choosing the best network monitoring software is a daunting task. As an MSP knowing the state and overall health of your clients’ networks is quite important as if you are unaware of it, you are headed for a disaster. With the technological advancements, there is an ample offer of network monitoring software in the market. 

These software have functionalities such as discovering devices, identifying network trends and traffic, graphically representing monitoring results, backing up network and device configurations, and primarily monitoring network equipment, servers, and applications. 

When it comes to choosing the right monitoring software to manage and operate your customers’ networks there are quite a few things you need to factor in like number of devices to manage, on premises or cloud deployments, co-managed IT, location of the deployment and of course budget. 

But before tapping into more details on how to choose the network monitoring software adapted to your needs, let’s agree on the basic terminology first, so we are all on the same page.

What is network monitoring tool?

Network monitoring tools are designed to monitor and manage the network traffic flow over a network. This tool is used mainly by network administrators and security staff as they monitor network deployments. This software automates most of the network monitoring processes and workflows. 

So you might be wondering what exactly it does? Well, this software monitors the network’s uptime, availability, and response time. It can also monitor unusual activity and alert the network administrator when something suspicious or malicious is detected over the network. The network monitoring process can be for a physical/wireless LAN, WAN, or both. 

Best network monitoring tools provides information such as Active devices and equipment on a certain network and IP addressing schemes. It routinely reviews the network for availability and generates an alert and notification when a problem or issue occurs. For instance, it will alert you when an access point goes offline, or any suspicious packet is detected. 

Network monitoring must be proactive, which is a necessity and its most important aspect. It is a process in which all the networking components such as routers, switches, firewalls, servers, and VMs are monitored for fault and performance and evaluated continuously to maintain and optimize their availability.

How to choose the best network monitoring tools?

Choosing the right network monitoring system makes all the difference in how accurately your customers’ digital infrastructure will work. The network monitoring tool is the most fundamental technology available for MSPs. With its wide range of capabilities and features on offer, you can select the best network monitoring software that will track network processes end to end. The tool ingests a vast array of performance metrics to discover, assess, optimize, and troubleshoot individual devices and keep cybersecurity threats at bay. Before selecting any monitoring software, it is essential to have a few things in consideration.

Firstly you need to check whether the network deployment is small, medium, or large. Usually, these tools are specifically designed for either small, medium, or large deployments. Also, depending on the type of deployment your customer wants: on-premise, hybrid or cloud-based. 

A lot of things matter while deploying a WiFi network and choosing an optimal monitoring tool. Generally, the small and medium businesses must select the tool that is easy to use and works with minimal configuration, so in the case of a co-managed infrastructure, both the MSP and the SMB can have peace of mind. 

The larger network deployments need a monitoring system that is more feature-rich and scalable. Businesses must have a dedicated team of professionals to manage the IT infrastructure to ensure its functionality. Hence, MSPs managing network deployments of any size should ensure that whatever tool they choose must include node and device inventorying, autodiscovery, automatic and configurable trouble alerts, warnings, and a web-based centralized management interface. 

Before selecting, it’s also recommended to understand your customer’s budget and see whether they would want high-performance or cost-effective devices to run the network. Thus, MSPs need to have a wide range of software tools within their portfolio to address each segment’s needs. For large network deployments, MSPs should opt for details over convenience, while small and medium deployments will want to prioritize user-friendliness. It is important to foresee that your customer’s network can potentially grow to choose a sustainable solution that can help you to help your customer scale when it’s needed.

An honest list of networking monitoring software

What are the best network monitoring tools for 2023? Here you have a list of 5 useful cloud solution for network management:

  • Manage Engine OPManager
  • PRTG (Paid Network Monitoring Solutions)
  • Tanaza
  • EventSentry
  • SpiceWorks

It is important to consider the amount of virtualization in your network while choosing a network monitoring tool. The network performance monitors differ in their ability to provide visibility within the virtualized environment. Before choosing software, it is important to find out which would be the best network monitoring software to handle the consistent and disruptive problems that your customer’s network will encounter. 

Manage Engine OPManager
OP Manager

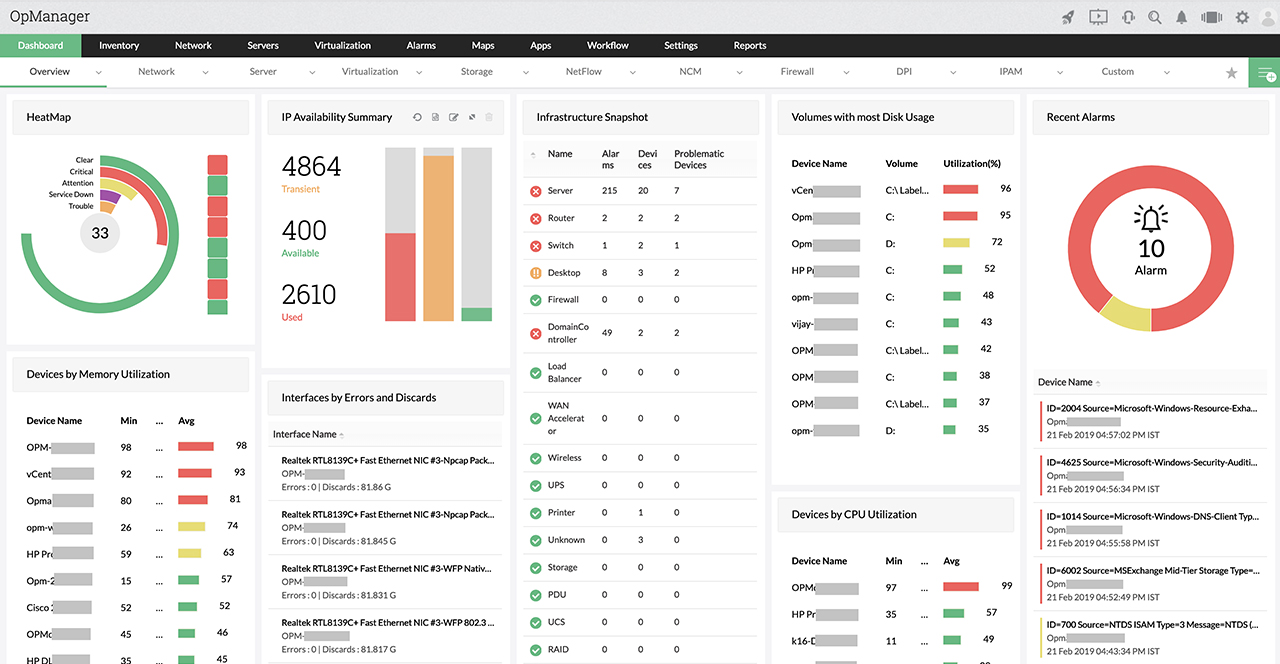
One of the famous network monitoring tools, Manage Engine OPManager, monitors SNMP devices, switches, servers, and virtualized network services. It features over 200 customizable widgets to build unique dashboards and reports. For numerous alerting channels, this monitoring tool supports email, SMS, and webhook. It uses intelligent alerting to reduce false positives by eliminating alert fatigue across larger networks. The only disadvantage of this tool is that it is time-consuming to learn. Being a feature-rich tool, it requires time to go through all the aspects and configuration settings. Also, it integrates well in the ManageEngine ecosystem with its other products. This tool is best recommended for users that want a simple infrastructure monitoring tool.

PRTG (Paid Network Monitoring Solutions)
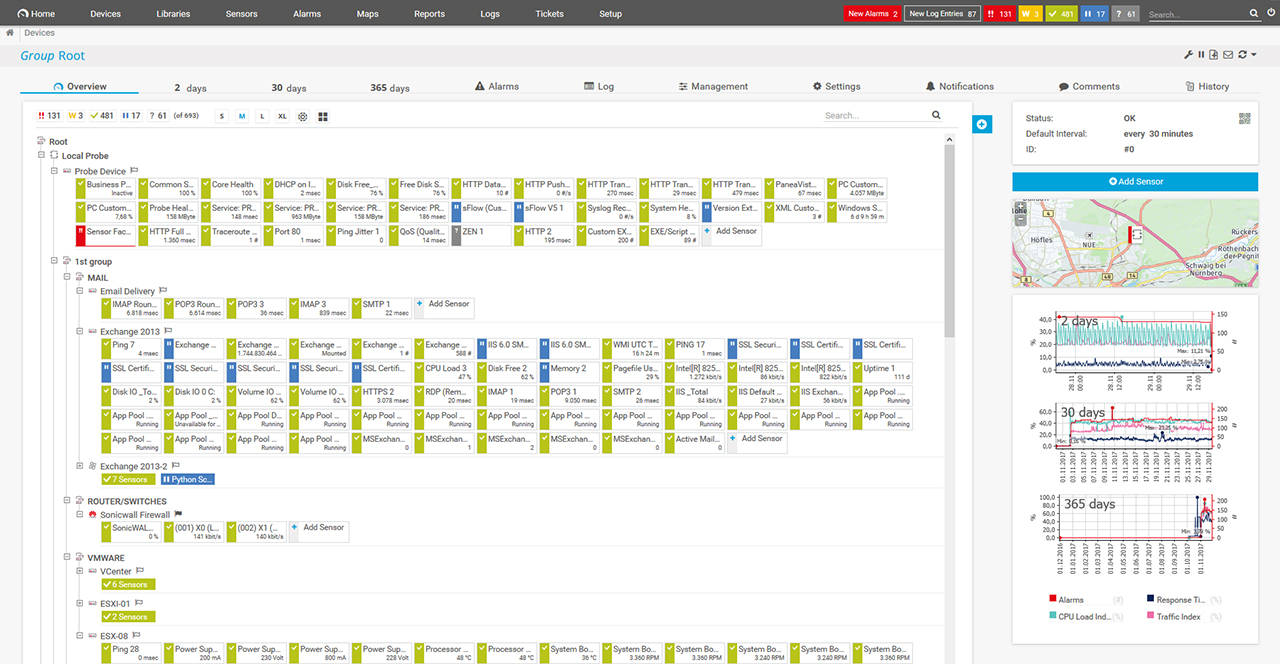
PRTG

The Paessler PRTG network monitoring tool is an integrated solution suitable for both small and enterprise environments. This monitoring software is more than just a server monitoring system. It is made to monitor any IT-related resources that connect to your network, including your firewalls, switches, servers, routers, databases, websites, and even USPs. 

This setup is dynamic, so its monitoring capabilities can grow or shrink with the business size or other requirements of your organization. This monitoring software is a windows program that can be installed on a server with shared access. PRTGs can also send email and SMS alerts based on your custom threshold levels so that network admins can get more frequent warnings from critical servers with shared access. 

This application can monitor everything you need to know about your servers, such as CPU load, hard disk capacity and performance, RAM utilization, and bandwidth monitoring. The primary benefit of this system is that it has a simple and clear user interface with functional elements conveniently located in in-built places. Some of the other key features of the system include multiple user interfaces to choose from, failover tolerant monitoring, and distributed monitoring. PRTG is free for 100 sensors, so it is considered great if you have a small network or are looking for a paid solution.

Tanaza
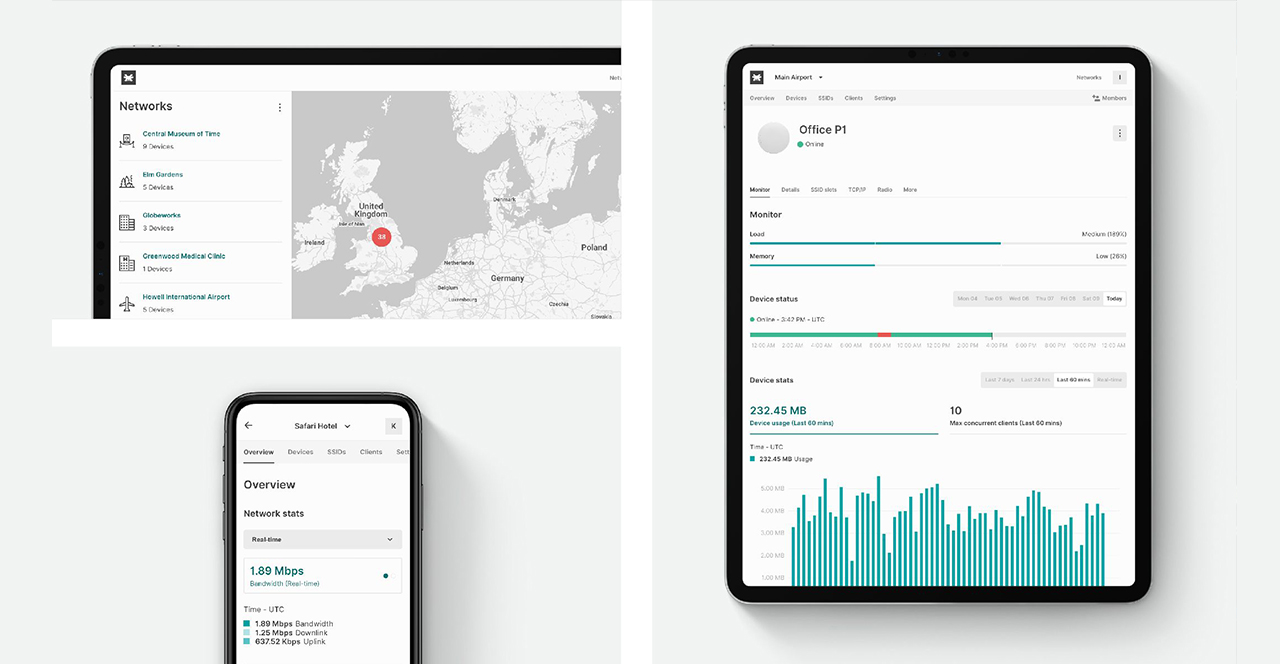
Best WiFi Monitoring Software 2021
Among all, Tanaza is an ideal solution for the best network monitoring software. It is considered best for MSPs serving small and medium businesses and enterprises or SMEs with in-house IT teams. We all know that businesses rely on networks for all operations. In today’s era, networks have to span globally, so network monitoring is crucial for any business. Being a subset of network management, a good network monitoring tool is required. Businesses are under quite pressure and need to manage affordable and straightforward IT infrastructure that works. Currently, the offers from famous network vendors such as Cisco Meraki, Ubiquiti or Aruba compel users to pay for expensive and non-flexible hardware. This hardware doesn’t allow other multi-vendor networking devices within the same network seamlessly due to lock-in constraints.

Tanaza’s operating system is the most reliable software as it delivers security layers that protect hardware from cyber attacks. Tanaza also delivers a scalable freemium model and a comprehensive marketplace that enables third-party software applications to offer added-value services for customers. It is the only single platform delivering world-class operational efficiency in IT operations. 

Tanaza allows you to manage remote access points, networks, and SSIDs. Furthermore, the zero-touch provisioning allows you to configure remotely any amount of devices and send them to the customer’s location only for installation. Once the device is ON it connects automatically to the platform and features all the configuration set up.

Tanaza has an intuitive interface and features multi-tenancy capabilities so you don’t have to share your credentials with any colleague. Each tenant can have their own and have different permission levels to the network. Furthermore, it’s the only software compatible with multi-vendor access points. MSPs can manage thousands of networks and access points in the cloud from different vendors from a single control plane. No other network monitoring software delivers the same.

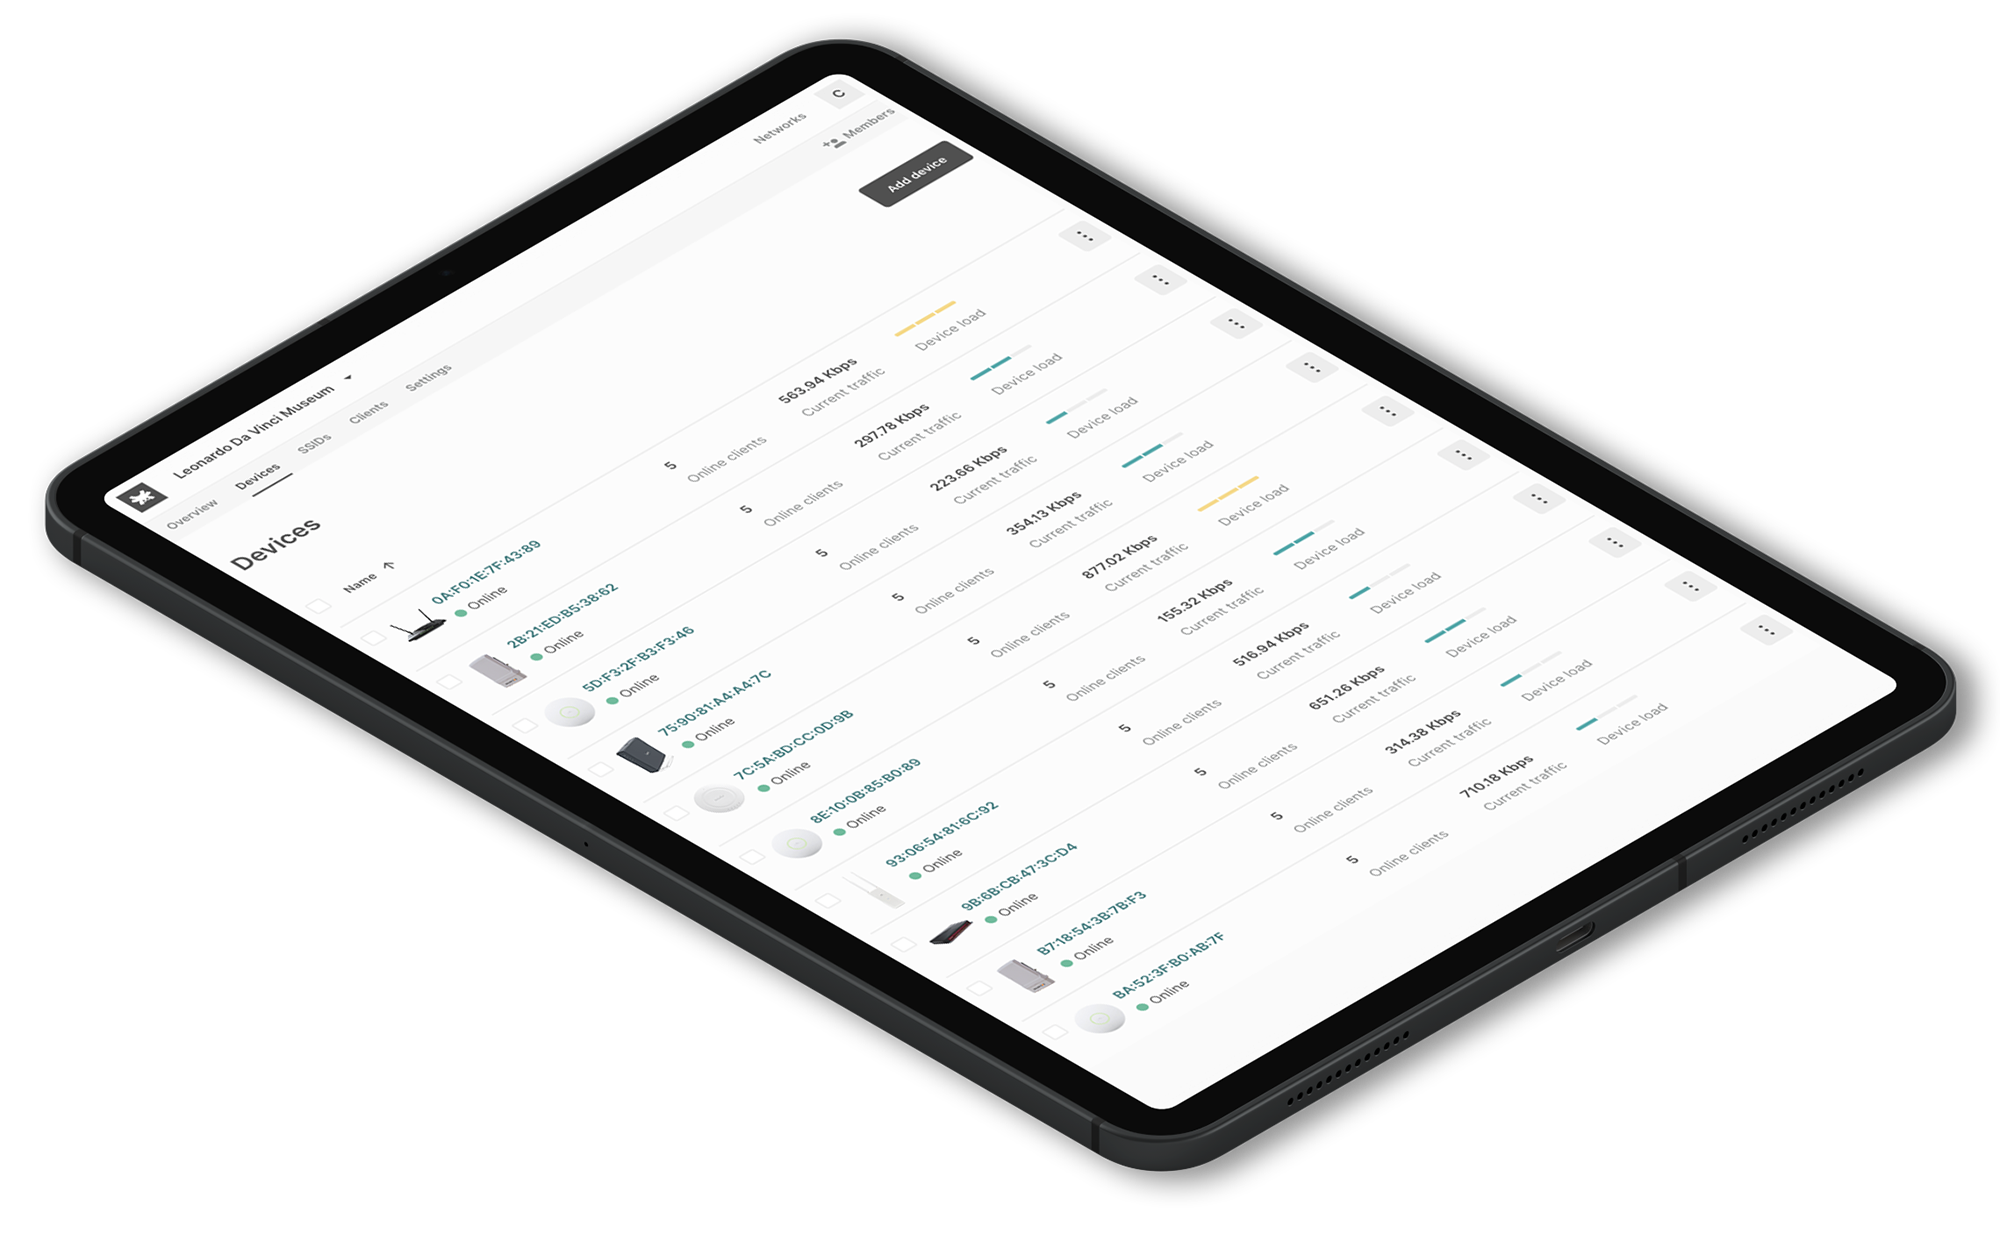
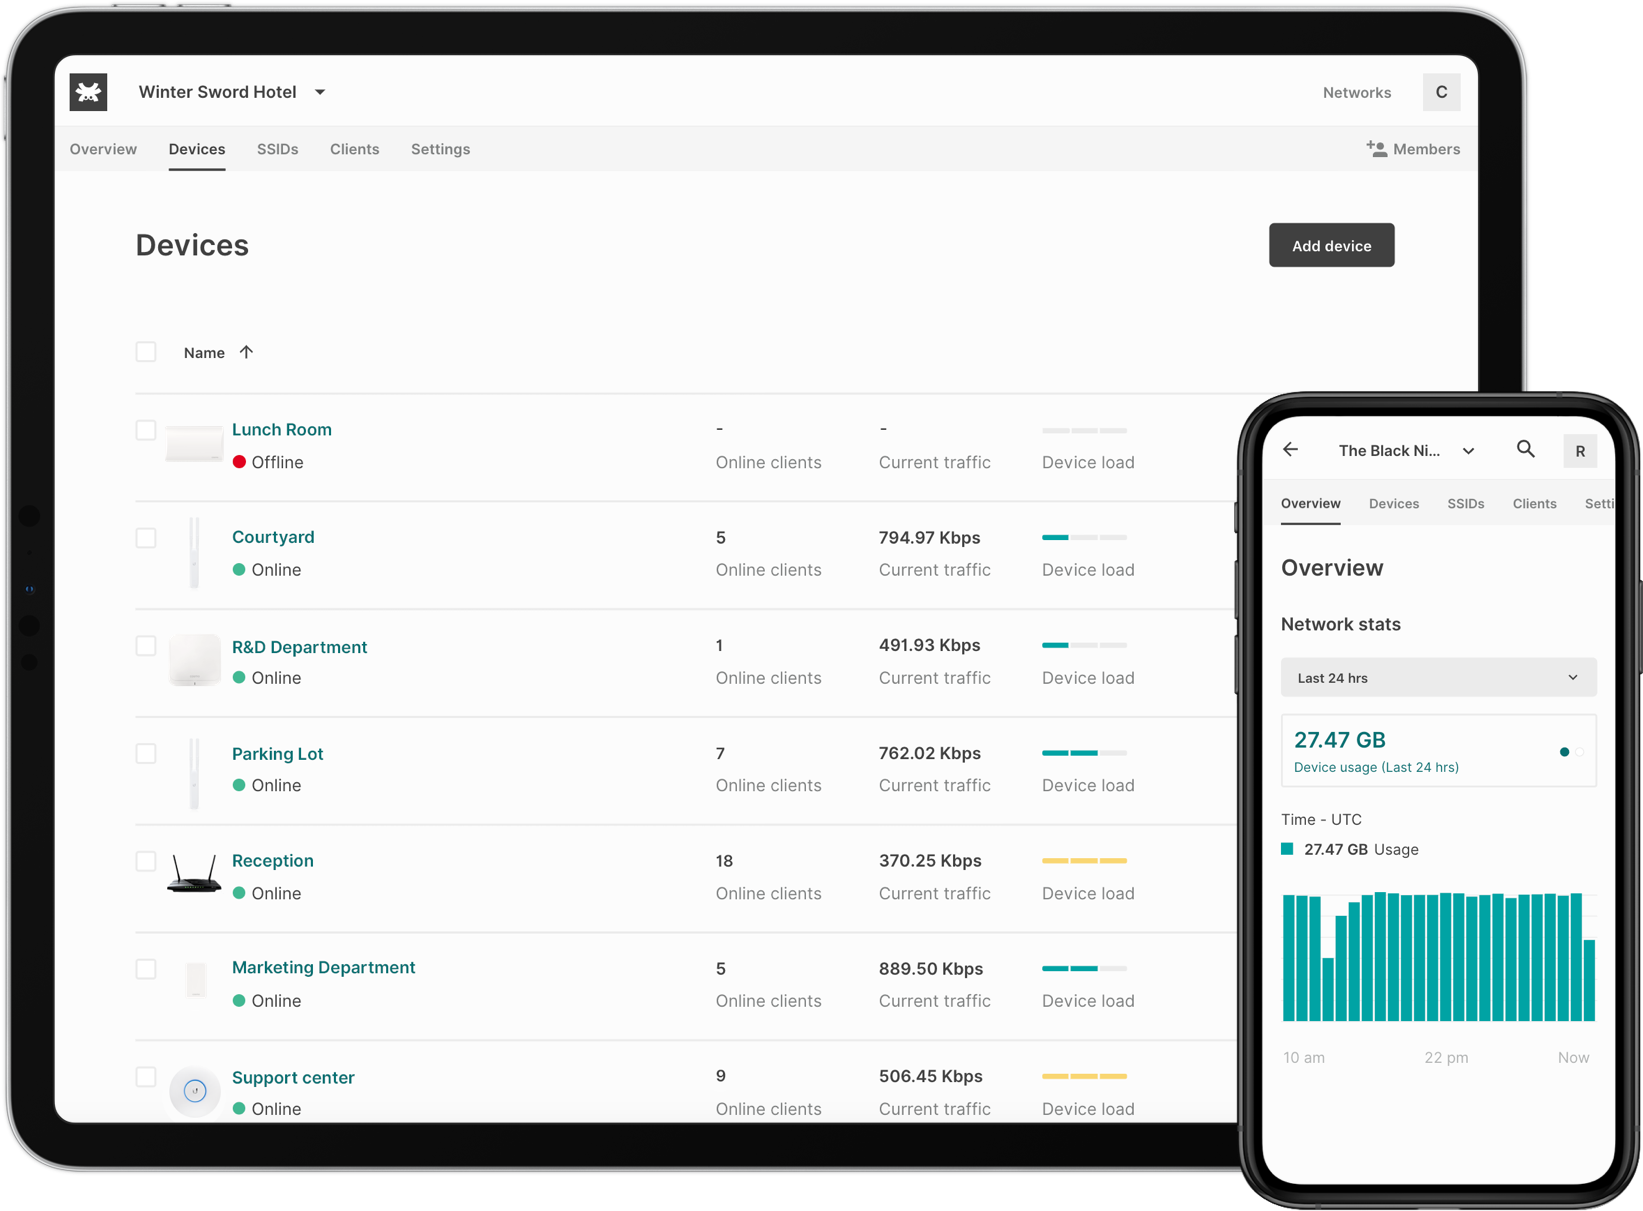
In terms of monitoring and network management, Tanaza allows MSPs to have a global overview of all the networks, and detailed information about:

  • the number of client devices connected in real-time;
  • uplink and downlink data rates;
  • SSIDs in a network;
  • devices’ load;
  • bandwidth consumption for each access point;
  • list of channels used by each access point;
  • historical devices status;
  • map display and much more.

Tanaza provides liability to SMEs/SMBs to choose from the hardware of their choice. They can select among cost-effective enterprise gear by saving on CapEx and OpEx as they can reuse their existing networking infrastructure and scale their networks.

EventSentry
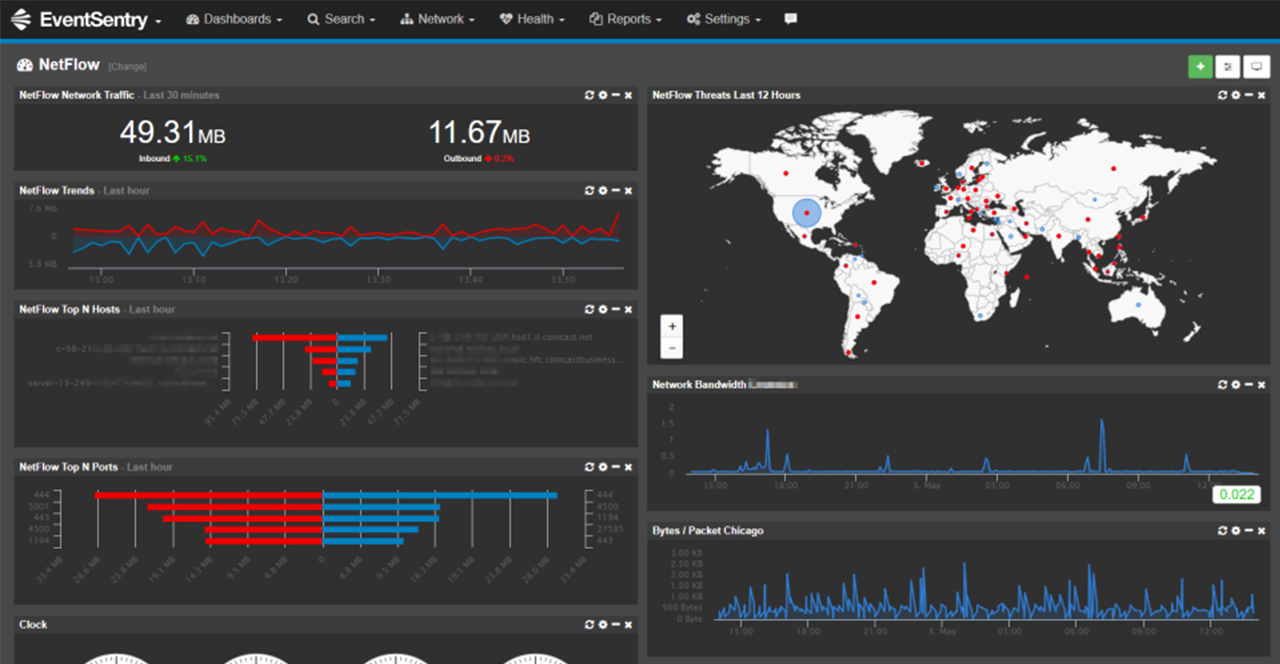
Event Sentry

EventSentry is an on-premise network monitoring software that is owned by NETIKUS.NET Ltd. It enables businesses to monitor their IP-based devices performances. The primary functionalities of this tool include monitoring server health and network performance by managing logs and compliances. 

It has a wide range of features such as heartbeat monitoring, SNMP, and Syslog monitoring. The only drawback of it is limiting false positives that become challenging at times. However, it is a good network monitoring tool that enables your business to comply with government and industry regulations such as HIPAA, PCL, and SOX.

SpiceWorks
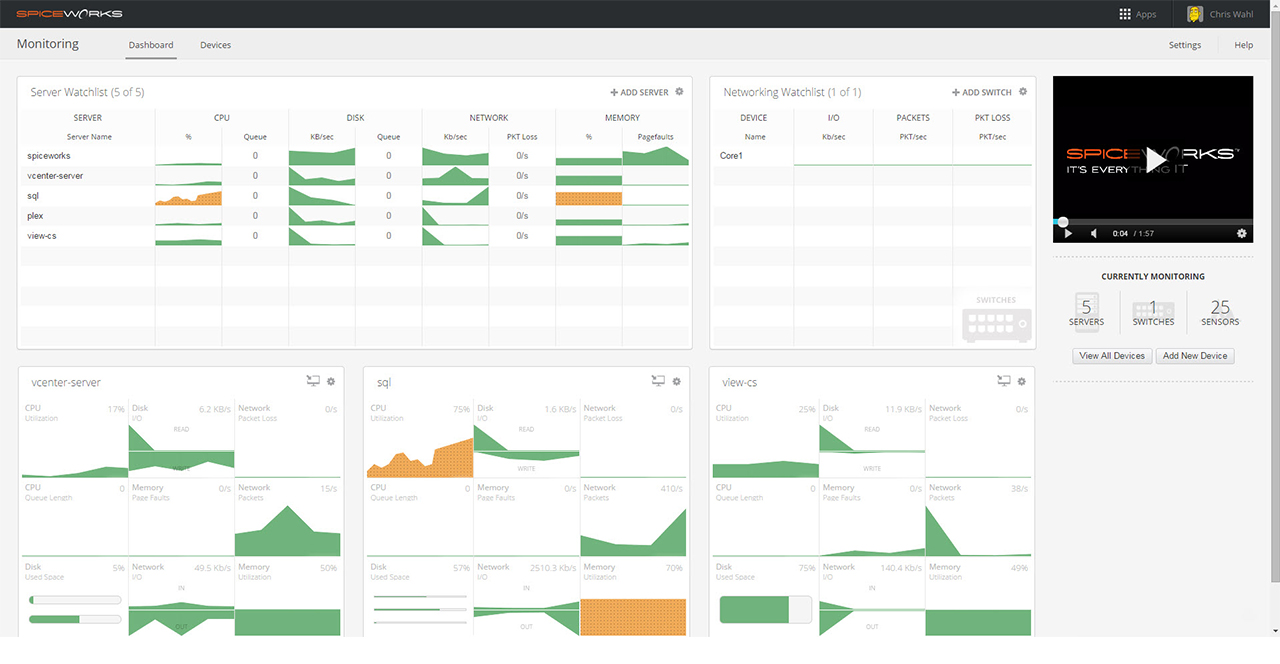
Spice Works

It is one of the open-source network monitoring software that is known for its scalability and flexibility. It is a great solution for granular monitoring of memory, disk activity, and more. The primary benefit of using this tool is that it is quick and also easy to implement. It allows independent thresholds per system or device. SpiceWorks tracks infrastructure devices such as switches and routers for input/output rate, packets per second, and packet loss. Though this tool provides excellent monitoring, it does not support SNMP version 3. It means that it does not reconcile systems that are going down. Also, its user interface is comparatively slow.

Among the top 5 best network monitoring software, it is up to the requirements of network admins to choose according to their IT infrastructure and business size. Tanaza represents itself as a comprehensive, affordable and flexible SaaS platform for IT professionals to manage WiFi networks in the cloud. Being the only software in the market that works with multi-vendor networking hardware.

Test the power of network monitoring with Tanaza

Start a free trial

✔︎ No credit card needed
✔︎​ Easy configuration

Load balancing

Understanding Load Balancing for Network Performance


Press play to listen to the article.

Try now the Tanaza
WiFi Management Platform

Get Started

✔︎ No credit card needed ✔︎​ Easy configuration

✔︎ Auto rollback when you desire

or continue to read more
about how to optimize throughput
with the correct load balancing settings.

What is Load Balancing?

Load Balancing is the process of distributing network traffic across multiple WiFi access points. In this way, any access point handles too many client devices connected to the same device.

By distributing the load evenly, load balancing helps to improve the responsiveness of applications. Furthermore, users can have greater availability of applications and websites.

Wireless networks are getting more and more popular and have become an essential part of our lives with the ever-increasing use of IoT devices. The reality is that users expect high-quality connectivity in all scenarios, especially in public spaces with crowded networks and multiple concurrent users downloading and uploading content simultaneously.

Hundreds of devices want to connect to a network comprised of multiple access points and a limited spectrum. For all of those devices to receive a decent connection quality, throughput, and delay, there shouldn’t be access points overloaded. Otherwise, it would not be easy to provide service for each client device connected to the network.

Load balancing and the IEEE 802.11 standard

The IEEE 802.11 standard specifies that the client device decides which access point to connect to. In high-density environments, the client device’s choice to connect to one or another AP can lead to an AP overload. It might also lead to oscillations in the AP association as a client device has limited data about the network’s performance.

Also, since it doesn’t collaborate with other client devices before connecting to an AP on another, it creates overload easily. This whole mix provides the recipe for undesired behavior for load balancing, as there is no control over the client devices.

How does load balancing work?

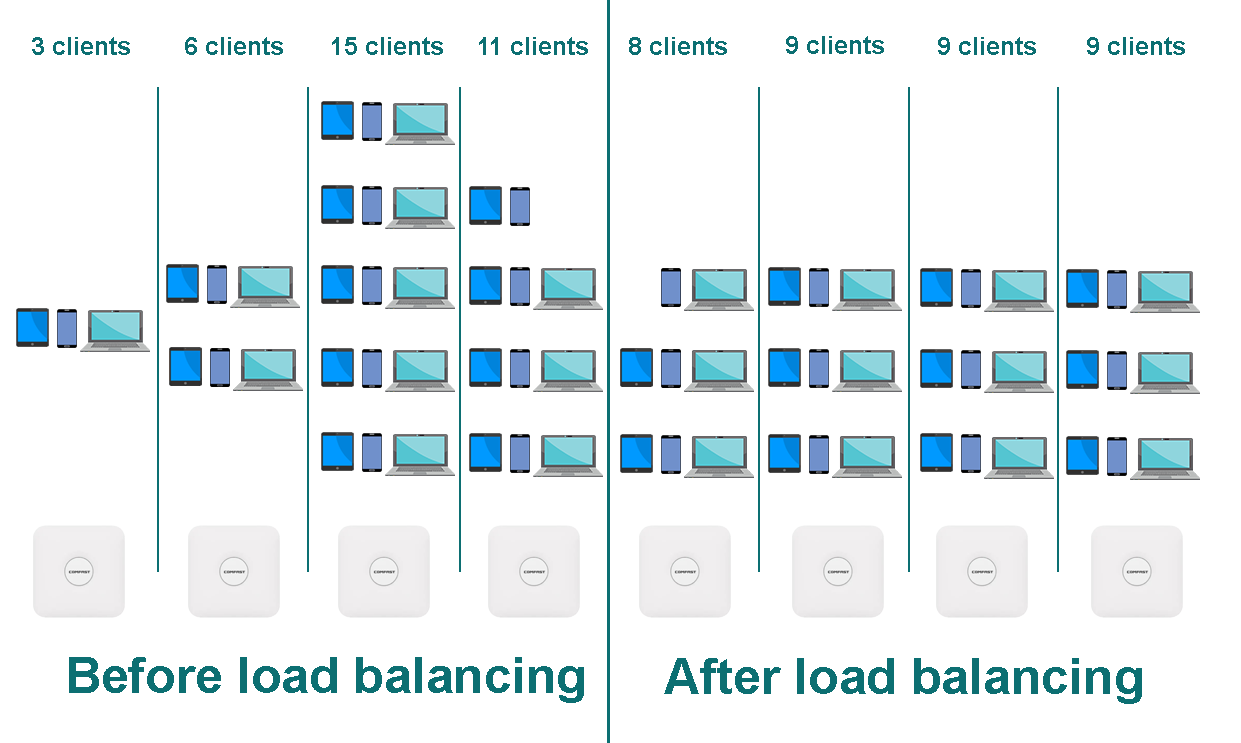
Load balancing ensures that client devices are distributed evenly, so no single AP is simultaneously overloaded with too many client devices. Therefore, the total number of client devices can be served by various APs, delivering better performance and an improved user experience.

If a client device wants to connect to an access point, it sends a “request of association” to the AP. If the access point is already overloaded with client devices connected, it will deny the client device’s association request. The client device then would have to resent a request of association to a nearby access point that it has more space to grant a “room” to the client.

A network with multiple access points shares the client devices’ load information. Load balancing is a mechanism that can exist in distributed architectures in which all the access points communicate with one another. Or in a centralized architecture that uses a WLAN controller.

It optimizes throughput for all client devices by continually optimizing user associations to give each client device optimal throughput. This improves the throughput for each client device and dynamically balances the client load for the network.​

Load Balancing: Before vs After

When do you need load balancing?​

Load balancing is an ideal setting to enable in high-density environments in which roaming is not necessary. For instance, a theatre room with multiple access points installed in the same open space. In a deployment of this type, the client device will hear all the access points and load balancing in this scenario is a must.

On the contrary, when it comes to deployments in which roaming is the star, load balancing is not the right approach as it would cause client devices to become sticky and stay associated with the access point way longer than it should. In this type of scenario, where roaming is a must, having load balancing can be detrimental for the roaming process. So be aware of the settings.

Hardware vs. Software Load Balancing

Load balancing typically comes in two flavors: hardware and software-based. Vendors of networking hardware load proprietary software into the device provided, which often uses specialized processors that activates the load balancing capabilities. Software solutions like Tanaza generally run on open standard networking hardware. You can install the Tanaza operating system on a compatible access point of your choice and manage the device from a single control plane.

Tanaza supports 802.11v. Besides helping to preserve the device battery life, this standard also allows the WiFi network to influence the device’s behavior, providing the information of nearby access points (like their load), optimizing client transition to the best identified AP. Activating this capability for the ideal scenario efficiently balances the number of devices connected to an access point. It also helps to direct poorly connected devices to the best AP.

If you are a Tanaza user and would like to activate 802.11v to improve the load balance of client devices in your networks, read this article to learn how to activate 802.11v within the Tanaza platform.

Try Tanaza

Experience the power of managing WiFi access points from the cloud with Tanaza.

Get Started
Tanaza OS

How to use the OSI Model to Troubleshoot Networks – Layer 2

How to use the OSI Model to Troubleshoot Networks at Layer 2

TransferTransfer

Our previous article discusses how to use the OSI model to troubleshoot network problems at layer 1. We covered how to outline issues with your WiFi Networks and how to troubleshoot them using the OSI model.

Just to refresh your memory, the OSI model helps break down an issue and isolate the problem’s root. Ideally, it’s best taking a layer bottom-up approach as most of the WiFi problems happen in the first two layers of the OSI model. If the problem is not in layer 1 or 2, it is not a WiFi problem. Period!

In this article, we continue our way up in the OSI model with the data link layer.

OSI Model to Troubleshoot Networks at Layer 2

Data link is the second layer of the OSI model. It relates to how the systems using a physical link cooperate with one another.

It helps to transfer data between two devices on the same network. The data is broken down into packets. The data link layer’s job is to define unique sequences to indicate the beginning and the end for each packet. Also, it is directly responsible for flow and error control in intra-network communications.

The data link layer has two sublayers: the Logical Link Control (LLC), which interprets electricity, light, and WiFi into 1s and 0s that become the data packets. The other sublayer is the Media Access Control (MAC) layer, accountable for moving data packets to the Network Interface Card (NIC) to another across a shared channel. Thanks to MAC protocols used in the sublayer, the signals sent from different stations across the same channel don’t collide.

WiFi radios talk via 802.11 frame exchanges at the MAC sub-layer of the data link layer. Therefore, the next layer to look into when troubleshooting networks is layer 2 of the OSI model.

Retransmissions

The most common problem in layer 2 is retransmissions that happens at the MAC sublayer. Everything starts when a transmitter device sends a unicast frame to a device. The receiver device uses a cyclic redundancy check, aka ‘CRC,’ to confirm the data packet reception’s integrity. If the CRC passes, it means the data packet has not been corrupted during transmission.

The receiver device will send an 802.11 acknowledgment ‘ACK’ frame back to the transmitter device, as a way to verify the data packet delivery. If a collision happens during the information transmission or part of the unicast frame is corrupted, the CRC will fail. Thus the receiver device won’t be sending an ACK frame to the transmitter device.

In turn, the transmitter device will transmit the frames again, causing retransmission. Retransmissions have a high impact on WiFi networks as it creates extra MAC layer overhead. Also, it consumes additional airtime in the half-duplex medium.

Layer 2 retransmissions have a negative effect. For instance, if the throughput goes down and latency goes up, it would most likely impact voice and video. So, an increase in latency will result in echo problems, and high jitter variations will result in disjointed audio. As a rule of thumb, for WiFi calls, the maximum rate of retransmissions your WiFi network can handle without affecting the service should be less than 2%.

Reasons for layer 2 retransmissions can be quite a few. For example, a radio frequency interference paired with low Signal to Noise Ratio (SNR) due to a lousy WiFi design. Both of them happening at layer 1. Furthermore, there’s the possibility of adjacent cell interference and a hidden node that can also cause higher percentages of layer 2 retries.

Let’s break the reasons down:

SNR (Signal-to-noise ratio)

It is the difference between the received signal power and the noise power expressed in decibels. The retransmissions at layer 2 increase when the background noise is close to the received signal power or if the signal is too low. Stats to live by for WLANs: A good signal quality should be between 20 and 25 dB. Anything below these ranges is considered low signal quality.

RF interference 

It plays a significant role in the retransmissions in layer 2. Excessive retransmissions will happen when frames are corrupted because of RF interference, and therefore, throughput is reduced significantly. If these retransmissions occur frequently, it’s essential to understand the source to remove the interference device.

Channel interference 

Let’s go back to basics. When designing the 2.4GHz WLAN channel allocation plan, make sure to use the channels available for 2.4GHz properly. When there’s an overlapping coverage cell, and overlapping frequency space, the chances of having corrupted data and layer 2 retries are remarkably high. Remember to set up a reuse pattern for 2.4GHz channels 1, 6, and 11 (US) or 1, 5, and 9 -sometimes 13 is also used in deployments for Europe. In this way, you prevent adjacent cell interference in your WLANs.

Hidden node

In wireless networking, a ‘hidden node’ means that a specific node ‘talks’ to a WiFi access point but can’t ‘talk’ directly with other nodes already having a ‘conversation’ with that access point. This should ring all the bells, because it leads to problems in the MAC sublayer as multiple nodes send data packets to the access point at the same time, thus creating interference at the AP level, resulting in data packet loss.

Side Note

When there’s frequent packets loss, and thus retransmissions occur often is crucial to keep an eye on the percentage of packet loss and retransmissions. Tanaza has an embedded ping tool in the cloud management platform that allows you to track data packet loss and network performance to identify connection issues proactively. Our ping tool measures and records the packet round trip time, which lets you know the levels of latency between devices. Additionally, it measures if there are any losses along the way while performing the ping test.

Roaming

Another common problem in layer 2 is roaming. Sometimes roaming problems occur due to drivers’ issues on the client device side, and sticky devices due to bad WiFi design. Usually, roaming improves for those client devices that support 802.11K protocols.

Furthermore, roaming has a correspondence with WLAN security. When client devices roam from one AP to another, they always need to go through an authentication process with the new AP. When AP’s act independently, establishing an authentication takes place every time the client device roams. 

For instance, an end user’s smartphone is connected to the airport’s WiFi – where dozens of AP’s coexist in the same network. If the end-user is on the move, without the inclusion of standards 802.11r/k, the smartphone disconnects from the existing AP before establishing a connection with the new one. 

As a result, the end-user experiences WiFi disconnection and latency while reconnecting to a new access point. It translates into dropped WiFi-based calls, websites loading slowly, difficulties in uploading images on social networks, and other negative performance. 

The Tanaza WiFi cloud platform supports the current fast roaming IEEE 802.11 protocols. The fast roaming standards are leveraged when a client device is connected to a secured-password or captive SSID in a wireless network. The standards allow the client device to roam quickly from one access point to another seamlessly. The client devices do not need to re-authenticate to the RADIUS server every time they switch access points.

By installing the TanazaOS operating system on access points that do not have roaming within the stock firmware, you can add roaming features following the IEEE 802.11r/k/v standards to the devices. Consequently, the Tanaza Operating System enables the fast roaming feature on top of multi-vendor networks of a variety of WiFi access points its compatible with.

Try Tanaza

Experience the power of managing WiFi access points from the cloud with Tanaza.

Get Started

✔︎ No credit card required

Tanaza OS

Troubleshooting wireless networks with the OSI model – Layer 1

Troubleshooting Wireless Networks

Troubleshooting wireless networks with the OSI model

TransferTransfer

In this article, we will present a guide about troubleshooting WiFi Networks at Layer 1 of the OSI model. Click here to read about Layer 2.

Deploying a robust state-of-the-art WiFi network that allows delivering high performance and reliability has turned out to be a challenging task for many enterprises. Wireless networks can be expensive and complex to set up and implement; thus, organizations, more than ever, seek assistance from Service Providers.

Rightful, having a cloud-managed WiFi solution that proactively pinpoints performance issues before your customers know they exist, has become a necessity. Nowadays, network administrators need to be able to troubleshoot issues right away, remotely, and fast.

Outline the issues in your Wireless Networks

Before attempting to solve any issues with WLANs is crucial to understand the root of the problem and gather information about the situation by answering the Five Ws questions (who, what, when, where, why), to outline the issue and define an action plan.

Identify the issue by asking the right questions to your customer.

  1. What is the problem the customer has? Is it a slow connection to the Internet or no Internet access at all? Or does the Internet connection drop randomly?
  2. When is the problem happening? All the time, at certain times in the day, once in a while? Timestamps are key! Check the access points log files you are monitoring.
  3. Where is the problem happening? Is the problem described in question one happening in one area? Multiple areas? Is it campus-wide. By asking this question, the problem can be isolated to a specific access point or area.
  4. Who gets affected by this problem? Does the problem affect one client or many client devices? If it affects many devices, it might be a deeper issue; however, if it’s affecting one client, it might be a problem with the device itself and not with the entire WiFi network infrastructure.
  5. Why is the problem happening? Mostly it could be associated with changes carried out by the customer. Understanding if the customer did any change to the WiFi structure that might have triggered the problem is crucial.

Once you have gathered all the key information from your customer, it’s time to start troubleshooting your WLANs, layer by layer.

Troubleshooting Wireless Networks with the OSI model

At Tanaza, we like to take a structured approach when it comes to troubleshooting wireless networks. We use the OSI (Open Systems Interconnection) model as a framework for troubleshooting networks.

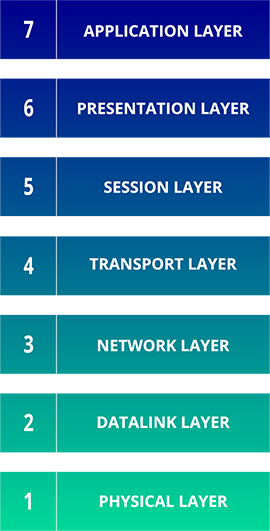
The OSI model is a conceptual model that enables different communication systems to “talk” in the same “language” using standard protocols. This universal language for computer networking splits up the communication system into seven different layers, each one stacked upon the last.

The OSI model helps to break down an issue and isolate the root of the problem. Ideally, we suggest taking a layer bottom-up approach. When it comes to WLANs, most of the WiFi problems happen in the first two layers of the OSI model. So, if the issue can be narrowed down to one specific layer, you can save some valuable time and avoid needless extra work.

OSI Model Layers

Troubleshooting Wireless Networks – Layer 1

The layer 1 of the OSI model, includes the physical equipment involved in the transmission and reception of data, like connectors, cables, switches, and fiber. In this layer, the data is converted into a bitstream, a series of 1s and 0s. That means the physical layer of devices, by default, must agree on code and modulations; thus, the 1s can be separated from the 0s on both devices.

As a rule of thumb, WiFi (802.11) operates at the first two layers of the OSI model, in other words, the physical layer and the data link layer. Broadly speaking, Physical Layer issues can be split into two main groups: outage and performance issues.

Outage issues

Investigating outage issues is the easiest one. Network admins can start by simply checking that all the equipment is connected correctly, and access points, switches, cables, and gateways are turned on and online. 

Performance issues

On the other hand, when delving into performance problems, it’s crucial to have the right tools to diagnose degraded performance. An easy and fast way to understand performance issues is by pinging devices to know whether the target device is active, the network path between source and destination is right in both directions, and also to measure the packet round trip time to determine latency and jitter levels. 

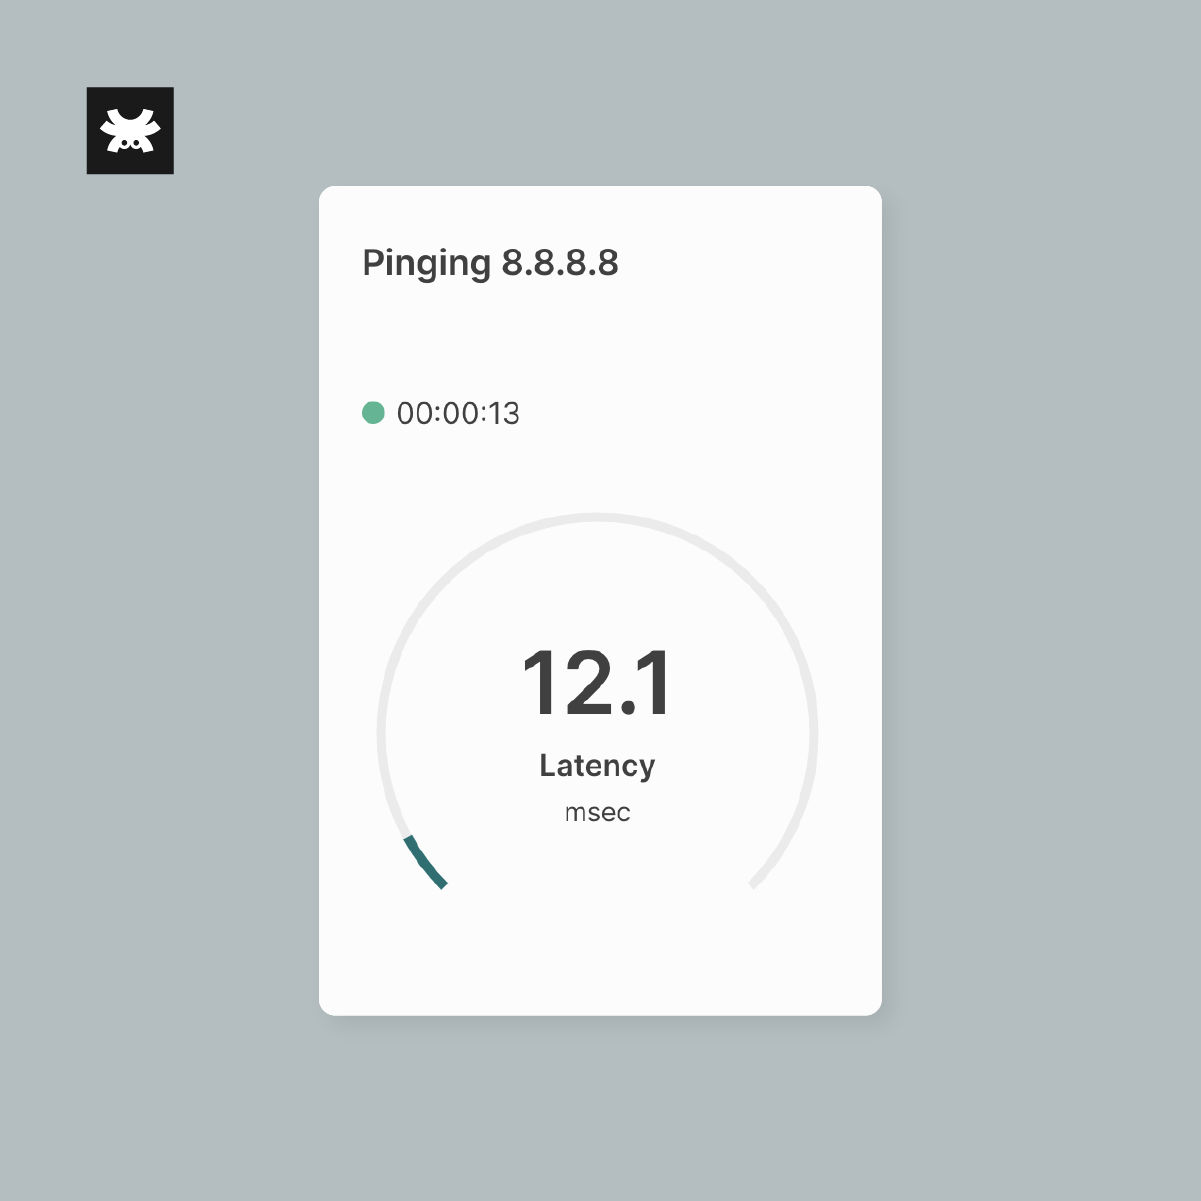
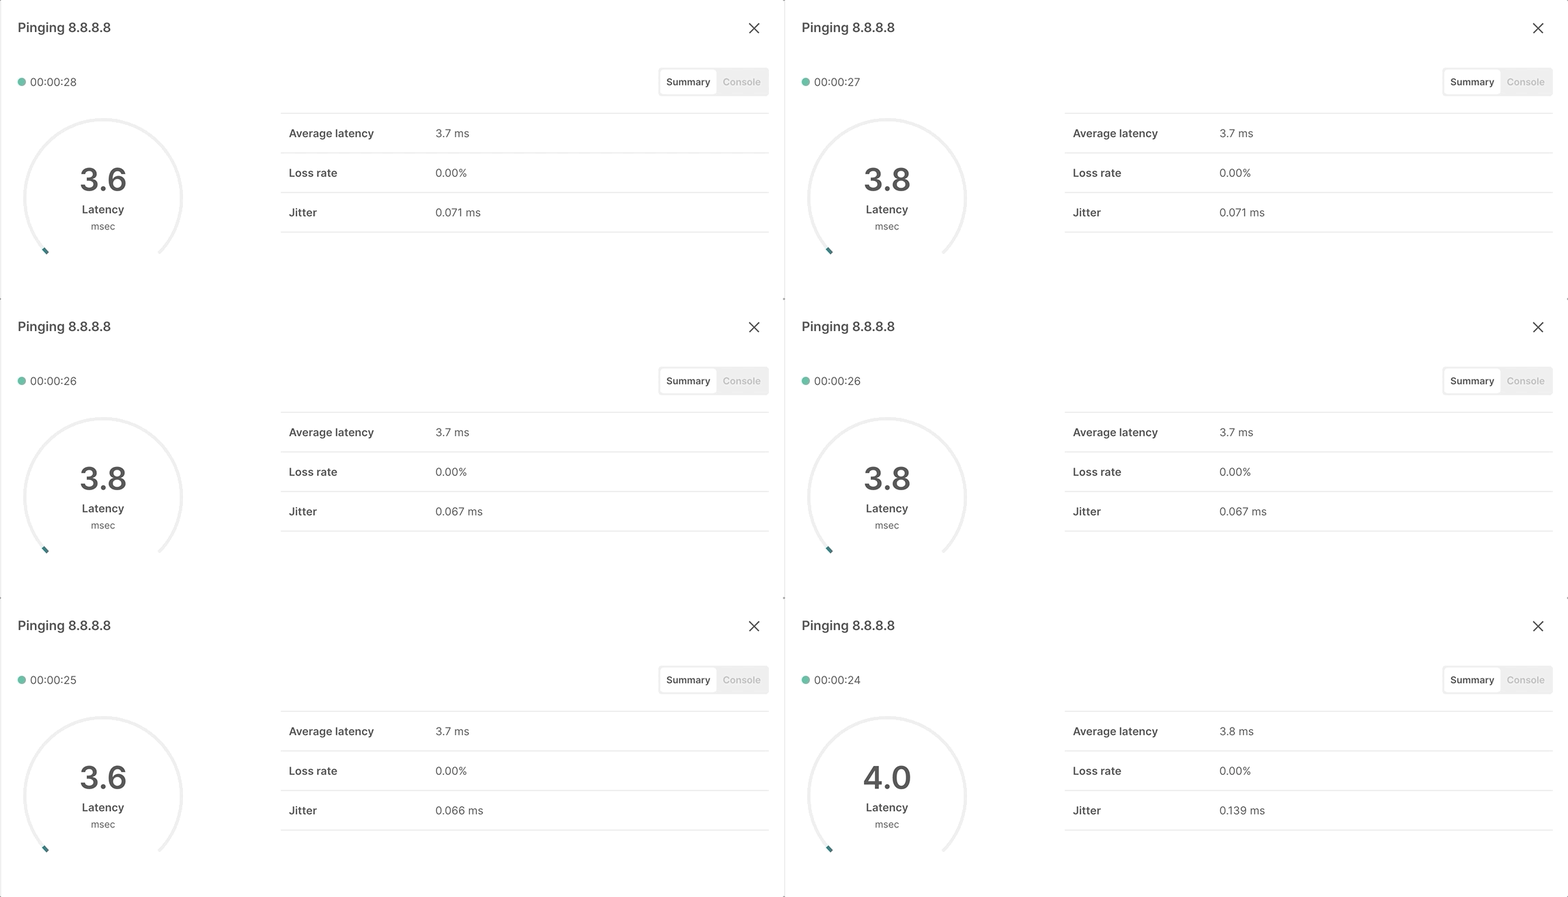
The Tanaza software has an embedded ping tool that allows network admins to perform routine ping tests. After pinging a device, the tool displays the ping results through dynamic diagrams. These graphics allow users to get a quick overview of the network situation in a fast and organized way, while at the same time pointing users in the direction of what’s causing the Physical Layer problem.

Also…

As part of the check-up, take a quick look at the configuration of the device’s drivers and the access points’ configuration. Commonly the main reasons for a breakdown in the connectivity. First-generation radio drivers and firmware are notorious for possible bugs, which often causes connectivity issues with brand-new access points. Ensure all client devices, whenever possible, have the latest drivers installed and ensure that all access points are up to date with the latest operating system. 

The Tanaza WiFi cloud management platform allows network admins to update the access point firmware of all cloud-managed access points in bulk without the need to reboot the devices and from remote. With each firmware release, Tanaza delivers turnkey features, patch vulnerabilities, and drive security and stability, to empower your devices.

Radio frequency signals can cause another potential performance problem. An outside entity causes noise that interferes with the signal or dataflow across the network, affecting not only the performance but also the coverage of the WLAN, i.e., a microwave interfering with the WiFi signal.

High Power. Having the access points transmitting at full power, particularly for indoor deployments, might lead to oversized coverage, increasing co-channel interference and roaming issues, like sticky clients. So, take a notch down in the access point power.  

You can always avoid these problems with good WLAN design. Most of the issues that appear because of inadequate WLAN design are coverage holes due to access points misplacing and antenna orientation and also co-channel interference. Design your WLANs for for capacity and air time, not for coverage. Read our 7 key recommendations to plan a better WLAN design.

In our next blog article, we will be discussing how to troubleshoot WiFi networks using the OSI model – Layer 2. Make sure to keep an eye on our Tanaza blog.

Looking for a cloud-based platform to manage your WLANs?

Tanaza is a complete cloud platform for IT professionals to manage WiFi networks. Our platform allows MSPs, System Integrators, Network Administrators and ISPs to improve their efficiency levels by managing all WiFi networks, access points, SSIDs and clients from a single platform.

Tanaza simplifies the implementation and configuration of multiple WiFi access points. Users can manage the settings of hundreds of WiFi access points from a single cloud controller platform. Tanaza allows to enable SSIDs, configure IP addresses, set radio power and channels, and more from the managed WiFi dashboard.

Users can increase operational efficiency by enabling network-wide configurations and maximize service availability. Configure access points without rebooting them or restarting the services. Apply the same configuration to multiple access points simultaneously, each access point added to the network will immediately receive the same configurations as the others.

Among the main features of Tanaza:

  • Centralized configuration
  • Remote monitoring
  • Multi-Role Access
  • Fast Roaming
  • Integrated hotspot with advanced analysis

Tanaza is compatible with the most well-known access point brands in the market, like Ubiquiti, Amer Networks, TP Link, LigoWave and more. Alternatively, users can choose from our line of Tanaza Powered Devices: wireless access points pre-loaded with TanazaOS – the powerful Tanaza operating system based on Linux.

Would you like to know more about the Tanaza platform? Download the Tanaza brochure

Try Tanaza

Experience the power of managing WiFi access points from the cloud with Tanaza.

Get Started

✔︎ No credit card required

Tanaza OS

Network Capacity Planning – Wireless Capacity vs Coverage

Network Capacity Planning – Wireless Capacity vs Coverage


Press play to listen to the article.

Try now the Tanaza
WiFi Management Platform

Get Started

✔︎ No credit card needed ✔︎​ Easy configuration

✔︎ Auto rollback when you desire

or continue to read more
about how to execute a perfect WiFi network planning.

Network capacity planning is the process of designing a wireless network for a specific location, bandwidth, number of access points, channel utilization, and other network capacity constraints. Doing proper network capacity planning helps network engineers to plan the WiFi structure adequately.

The process of designing a WiFi network can start in many ways. All IT teams take a different avenue when it comes to planning a WLAN’s structure. However, the goal of providing connectivity to a specific location in which users will be connected to the network doesn’t change.

In our previous article, we have put together seven key recommendations for network engineers to plan a better WiFi network design.

In this article, we will take a hands-on approach to plan wireless networks. Before deep-diving into it, let’s take a quick look at the differences between planning a wireless network for coverage vs. capacity.

Wireless network for coverage

When deploying WLANs for coverage, there are three main variables to consider: device power settings, physical environment (like buildings, obstacles, walls), and the device antenna capabilities. The latest enterprise gear will automatically adapt their settings to supply ideal coverage. However, long gone are the days when we used to plan for coverage. Nowadays, with the fast-paced growth of IoT devices connected to networks, users not only want to connect their laptops and smartphones to a WiFi network. They want to be on the move and still have a great connection. They want to upload, download, and stream content without the ‘suffer-buffer’ and slow loading rates. 

Consequently, planning only for coverage seems falling short for the current users’ needs. A proper WLAN design for capacity and coverage, paired with spectrum analysis and validation site surveys (pre and post-deployment), will reduce most of the support tickets coming your way related to the performance of your customers’ networks.

Wireless network for capacity

When designing for capacity, instead, we need to analyze multiple variables that will shape the final decision, like the main application to be supported, how many users will be using the network simultaneously, estimate bandwidth per user, and access points throughout. Also, plan for site survey validation that among all the things that are useful for, it helps you to avoid the typical coverage holes in the WiFi networks.

Nowadays, designing WLANs rigidly for coverage is an antiquated concept. WLAN capacity and airtime consumption reduction come first. However, before starting a WLAN design, it is necessary to assess the primary purpose of the network, the main application to be supported, number of concurrent users, type of client devices expected in the network, bandwidth per-user goal, and access points throughput.

Let’s look at each segment in greater detail.

Wireless Network Capacity Planning – How to get started

Follow these steps to start your WLAN design based on capacity:

Assess the application bandwidth requirement

When assessing the application throughput, there’s a primary application that drives the need for connectivity. Let’s take a school as our main example for this article. 

The school’s primary application might be browser-based, streaming a video class, or a learning platform. Understanding what the school needs will help you to know what should be the per-user bandwidth goal. The latter will drive further design network decisions.

We have a tool that can help you to calculate the bandwidth requirement. We created it to suggest the type of access points suitable per location and application type, but to estimate the required bandwidth per-user connection, it comes in handy. Check it out here.

Assess the Aggregate Application Throughput

Once you know the bandwidth throughput per application and connection, you can calculate the aggregate application throughput needed in the area you intend to cover with the WLAN.

As a thumb of rule, you should have an aggregate application throughput for different areas. For instance, one for the classrooms, another one for the halls and the staff offices, as the connections and usage might differ in each area. 

So, let’s say you are designing a WiFi network for a school to support video streaming, which requires at least 3 Mbps per user in a classroom of 50 students.

[Application Throughput] * [Number of Concurrent Users] = Aggregate Application Throughput
So if we do quick maths, it would be:
3 Mbps * 50 students = 150 Mbps for the classroom
Note: the result you get here is a theoretical estimation to use in the calculations of the step 4.

Assess the Aggregate Throughput per Access Point

In practice, most APs support the latest technologies and maximum data rates defined as per the standards. However, the average AP throughput available is usually dictated by other factors like client device capabilities, concurrent users per access point, type of technologies to be supported, and bandwidth.

In reality, client device capabilities can have a meaningful impact on throughput as client devices supporting only legacy rates will have lower throughput than a client device supporting newer technologies. 

When assessing client device throughput requirements, you can run a survey on client devices to determine their wireless capabilities. For instance, if the school wants to prioritize throughput for proprietary hardware, you should identify the supported wireless bands of those devices (e.g., 2.4 GHz vs. 5 GHz). Also, check on the supported wireless standards (802.11a/b/g/n/ac), and the number of spatial streams each device supports. 

Recommendations:

  • To ensure the quality of experience, make sure to have around 25 client devices per radio or 50 client devices per AP in high-density environments. 
  • Also, consider in a high-density context, we’d suggest having a channel width of 20 MHz to reduce the number of access points using the same channel.
  • Client devices do not always support the fastest data rates. Thus, based on the manufacturer’s advertised data rate, then estimate the wireless throughput capability of the client device. A common practice is to consider about half of the data rate. Then, based on that value, reduce further the throughput by 30% for a 20 MHz channel width.

Calculate how many access points are required for a perfect network capacity planning

We suggest double-checking the application throughput requirements. This will have a high impact on the number of access points to deploy and, therefore, it will increase your operational costs if miscalculated.

Going back to our previous example, designing the WLAN for a school, with the following requirements and assumptions:

  • Main application to support: video streaming, which requires 3 Mbps with standard resolution.
  • The classroom accommodates 50 students streaming video to the school laptop at the same time.
  • All laptops support the 802.11ac wireless standard. Also, have 3 spatial streams capability.
  • The WiFi network is configured for 20MHz channels.
  • The WiFi access point yields up to 101 Mbps of throughput.

To calculate roughly how many APs are needed to satisfy the video streaming application capacity, use the following formula:

[Aggregate Application Throughput] / [Access Point Throughput] = Number of Access Points based on throughput
150 Mbps/101Mbps = 1.48 ~ 2 APs per classroom.

Once the number of access points is defined, then the AP’s physical placement can take place. Carry out a site survey to ensure adequate signal coverage in all areas and also proper spacing of APs on the floor plan with the minimum co-channel interference and proper cell overlap. It’s crucial to consider the RF environment and construction materials used for AP placement.

In our next blog article, we will be discussing how to calculate the real access point throughput vs the one advertised by the manufacturer.

Make sure to keep an eye on our blog. We will release weekly blog posts about WiFi network design, key for a healthy and well-performing WiFi network.

Try Tanaza

Experience the power of managing WiFi access points from the cloud with Tanaza.

Get Started

✔︎ No credit card required

WiFi Ping Tool – Troubleshoot Networks in Few Seconds

Tanaza WiFi Ping Tool – Execute routine ping tests and troubleshoot networks in few seconds


Press play to listen to the article.

Conducting ping tests routinely with a performing WiFi ping tool has multiple benefits. Pinging devices allows WiFi network managers to know more about the overall health of their networks. It’s essential to know the availability status of all the access points and routers —also, the latency rate of requests, Jitter, and packet losses.

Consequently, it is vital to know and understand the history of WiFi ping tests and how ping tests work. Tanaza is launching an improved WiFi ping tool, to help MSPs execute routine ping tests and stay up to date on the networks’ performance.

What is a WiFi Ping Tool?

A ping tool is a software utility to test the reachability between the requesting host and a destination host. It is the most common network tool used to provide a basic connectivity test.

The ping measures the time that takes for packets to arrive at the destination host from the requesting host and back. This tool is useful for troubleshooting WiFi networks and test responses. Also, it provides users with the exact location where a specific problem may exist in the network.

For example, if the connection to the Internet goes down in a specific location, the ping utility can be useful. It helps to better understand where the problem exists if it is within a particular AP or the WiFi network.

How does the WiFi ping tool work?

Users can select a specific access point and use it to PING another device. To ping the device, users can use an IP address or a domain name.

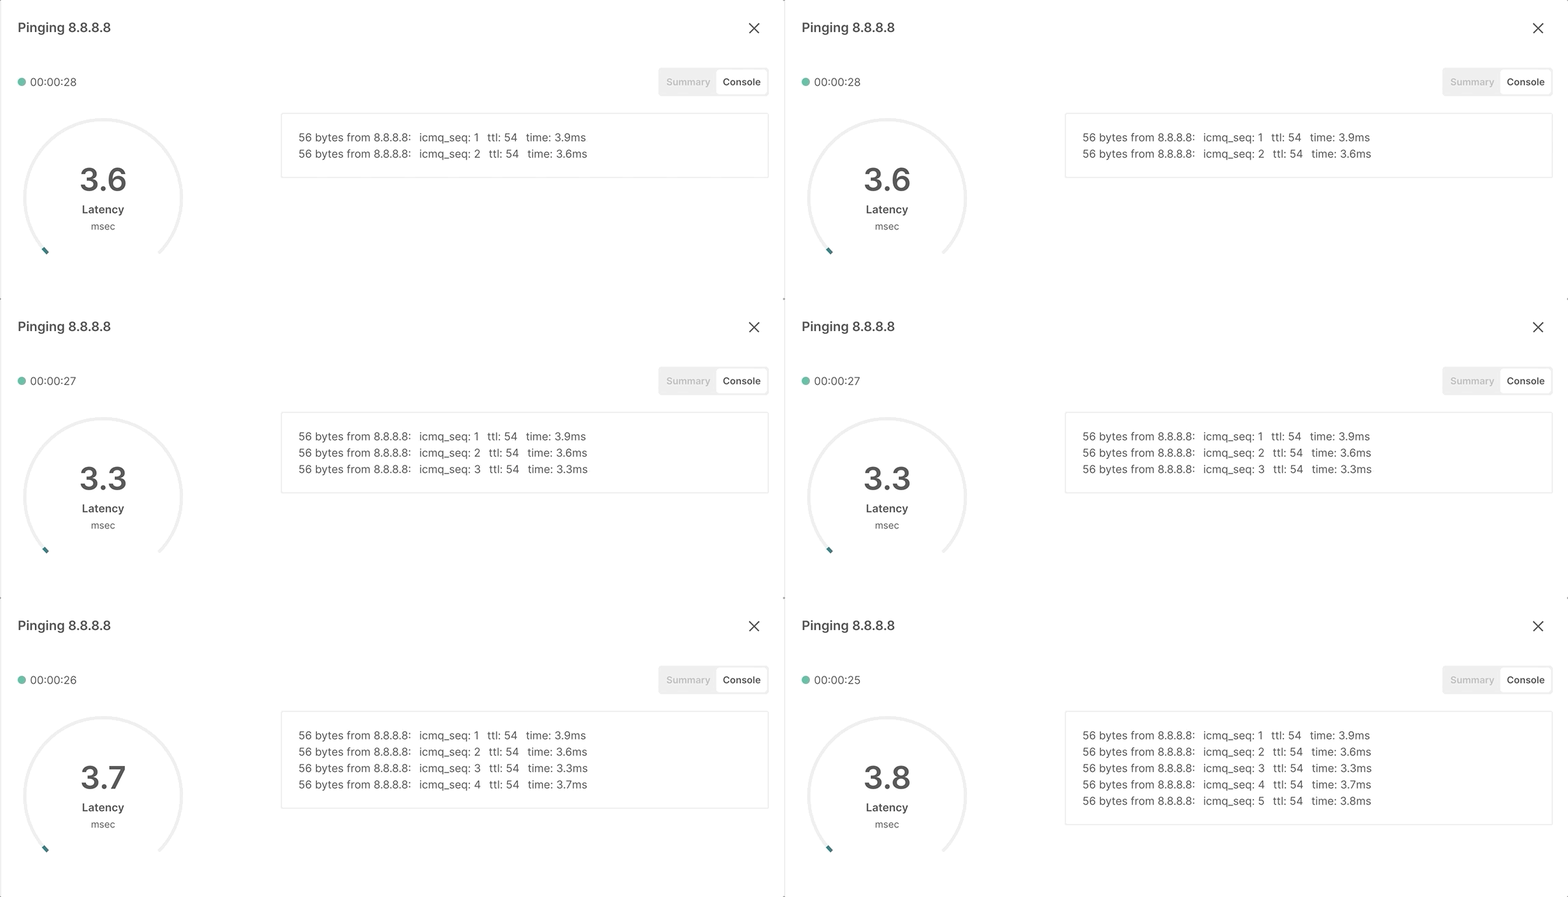
Once the user inputs the information and clicks PING, the system starts immediately pinging the intended device. After the attempts are over, the tool displays reached information values for average latency, loss rate, and jitter. Also, it shows a full history of the console. Users can also restart the ping if needed.

Also, users can set advanced settings like interleave, packet size, attempt counts, and timeout, in the advanced mode tab. Moreover, users can carry out multiple pings in parallel, with a maximum of 10 ping instances happening at once.

How do users visualize the WiFi ping results in the Tanaza platform?

The Tanaza platform displays the ping results through dynamic diagrams. These graphics allow users to get a quick overview of the network situation in a fast and organized way.

802.11

Also, if users switch to the console view, they visualize the history of the attempts updated in real-time. The ping tool measures and records the packet round trip time, which gives an idea of latency between the two devices. Also, it measures if there are any losses along the way while performing the ping test.

802.11

In the new Tanaza platform, ping tests can be carried out between local and remote devices, such as over the Internet or a VPN. As long as the devices are online and updated with the latest TanazaOS firmware (current version 3.3.2), tests can be carried out without any inconvenience. Ping tests cannot be carried out on disabled access points.

How to read data from the ping tool

1. What is Latency Rate?

In terms of networking, latency is the time that takes for a data packet to travel from the requesting source to the access point and then for the latter, to process it and send back an answer. For performance purposes, MSPs should always look for the timing to remain as close to zero as possible. In short, low latency implies there are no delays, and instead, high latency means there are many delays.

What would be an acceptable Latency in WiFi networks?

The average latency of a WiFi network will depend on two factors: wired or wireless connection, and quality signal. The information below is valid when pinging devices on the local network.

Typically, a wired connection has a latency of 1 millisecond or less. Whereas a wireless connection should generally be in the range of 1 to 3 milliseconds. The reason a wireless connection experiences more latency is due to the operation of encryption and decryption that it needs to go through, which in general lines takes more time compared to a wired connection. The wired connection only needs hardware operation and transmission, and as a result, the latency is much less.

Last but not least, the network signal is another key point to factor in. The higher the network signal is, the lower the ping would be. So, network managers know that the speed related to their networks depends mainly on signal quality.

When the average latency figures in networks (wired or wireless) go above the aforementioned threshold, that’s when network managers should start to worry. If latency figures, go as high as 4-6 milliseconds, it means the network is heavily congested. Also, it could mean that networks might be experiencing lots of collisions. Any figures beyond 4-6 milliseconds, it means poor WiFi connection or also interference caused by other devices nearby.

2. What is Jitter?

In networking, jitter -measured in milliseconds, is the variation in latency and response time of packets carrying data, like voice or video, over a communication channel. A healthy connection would consistently report back the same latency at all times. In contrast, slow or congested networks will show high levels of jitter.

In a network, the sender forwards packets spaced evenly apart in a continuous stream. However, if the WiFi network is congested packets start queuing. Also, if there are errors in the network configuration, it can result in significant variations in packet delay. This means that packets will not be received in the same order or possibly drop entirely on the way.

When MSPs are in the presence of high-level jitter variations, it can only indicate problems within the network. For example, web browsing is highly resistant to jitter, however, streaming data, voice, or music is much more susceptible.

What would be an acceptable Jitter in WiFi networks?

If a user has a VoIP call and the jitter surpasses 40ms, it will cause severe deterioration in the VoIP call quality. The tolerance of jitter will depend on the application. But, as a rule of thumb, jitter tolerance should be below 30ms to guarantee excellent user experience.

3. What is Packet Loss?

When it comes to monitoring network performance, it is crucial to know and understand how to stop packet loss. Let’s get started by unfolding first the terminology.

A packet is a small unit of data carried over a digital network. Data packets follow a defined path to keep the efficiency in networks. However, before a data packet is sent to the receiver, it is evenly distributed into blocks of information. Once the data packets arrive at the destination, they reassemble again.

Why does packet loss happen?

When packets travel within the network, sometimes they can’t make it through and won’t arrive at their destination. Data packets get lost or dropped in transit during their journey.

Thus, when packets are not successfully delivered, it slows down the speed of network traffic, as it causes a blockage. This creates a sort of congestion in the network throughput and takes upon bandwidth.

The risk of not acting soon to reduce the percentage of lost rate can be costly for MSPs. Investing in additional IT structure and adding more bandwidth to fix the latency caused by packet loss, would be needed.

What are the causes of packet loss?

The exact cause for data packet loss can be due to a variety of reasons. For example, the most common cause is network congestion. When the network traffic hits its maximum capacity, packets start queuing to be delivered. As a result, data packets get a hard hit when a network is catching up with traffic. However, most applications will resend the data packets or slow down the transfer speed to allow them to make it through.

Other reasons for packet loss could be overloaded devices or issues with the network hardware. Also, inadequate structure for handling packet loss, and even security threats in the network. However, there are ways to prevent packet loss, although it’s worth highlighting that it’s impossible to achieve zero packet loss. There will always be issues in the network, multiple client devices connected at the same time or overloaded devices. This would make it extremely difficult to achieve a zero % loss rate.

What can MSPs do to troubleshoot networks?

Troubleshooting networks with high levels of Latency and Jitter

The leading cause of high variations in Jitter and Latency on WiFi networks is a mix of bandwidth, potential interference, and the number of client devices connected to the network at the same time. To improve latency, MSPs need to work around these aspects. On the other side, variations in the amount of bandwidth used cause Jitter.

Hence, a slow connection speed would cause high latency. The more interference, the lower the bandwidth available to use. Finally, the more client devices connected to the network, the higher the variation in Jitter. Also, connected devices that aren’t transmitting data cause more interference, thus increasing levels of Jitter.

Apply these hacks to reduce latency and jitter levels

1. Hardware, hardware, hardware! Make sure your equipment is up to date with the current WiFi standards. Legacy access points don’t make proper use of the spectrum and can be more sensitive to noise, causing problems to signal, therefore affecting throughput.

2. One of the key recommendations is to reduce heavy users and get them to connect to the Ethernet, to take the load off from the WiFi network. However, in outdoor – medium and large scale deployments, this is not scalable, to not say nearly impossible. With the Tanaza platform, MSPs can limit the amount of bandwidth at the SSID and client level.

3. Assess the channel bonding of your wireless networks. For instance, newer devices allow users to have 40Mbps channels on the 2.4GHz and up to 160Mbps on the 5GHz. To lower the latency is essential to have more bandwidth.

4. Deploying more WiFi access points will help to increase the signal and provide more bandwidth, in consequence, reducing levels of latency and Jitter.

5. Set up multiple access points using different frequencies rather than using repeaters, which unfortunately help wasting bandwidth.

Troubleshooting WiFi networks with high packet loss rate

Our first recommendation before trying anything else. First, make sure all the access points and routers within the network are updated with the latest Tanaza firmware. Our R&D team always fixes bugs and issues with each firmware release.

Try these simple tricks to fix packet loss:

  1. Check all connections are properly configured and plugged-in correctly.
  2. Restart the whole system. It might give a clean jumpstart to the network pushing it to fix internal glitches or bugs.
  3. Remove any application or devices capable of causing static, like Bluetooth, wireless devices, and cameras.
  4. Use an Ethernet cable connection instead of WiFi. Packets tend to get lost easily over WiFi. Consider even a fiber optic cable to connect to the Internet.
  5. Consider, also replacing legacy hardware and look out for the network infrastructure, too.
  6. Deploy more access points. This will increase the signal and provide more bandwidth, thus reducing jitter and latency.

A final thought on this section: it is critical for optimal network performance to detect, troubleshoot, and prevent packet losses. However, it’s fundamental to keep in mind that packet loss happens, and no software in the market can stop this. Monitoring constantly the network and having visibility of it, is a way to prevent and lessen the impact on packet loss.

The golden rule for us at Tanaza is: “an issue you can see, an issue you can solve.” With the Tanaza platform, MSPs can have a complete overview of all their networks and organizations from a single dashboard. With the ping tool, MSPs can detect problems within the system and isolate them to find a solution. Feel free to reach out to our customer service team if you have any questions about how to solve the issues detected by the ping tool.

Read more…

If you would like to know how to run a Ping test in the Tanaza platform, read this step-by-step WiFi Ping tool guide, which will walk you through the entire process.

Are you ready to try Tanaza?

Jump in and experience our interactive demo with all the features Tanaza can offer to manage WiFi networks like a pro.

Try our interactive demo
Cloud Platform pour surveiller les appareils WiFi Ă  distance

Related articles:


MSPs – The ultimate guide to the 802.11 ax wireless standard

TanazaOS and OpenWRT – Differences and similarities

https://www.tanaza.com/blog/cost-of-wireless-networks/